


I just LOVE
Chef in Training's
Tuesday Talent Show
and SUCCESS U's

However, I can NEVER remember
what I have posted there.
(This week I was late posting . . .
I'm #163 for the Chef and #20-somthing at U.)
So, from now on, I'm labeling them
so they can be found.
(Don't want any repeats, do we?)
So, without any more wait,
here is my crochet pattern
for Towel Toppers . . .
remember,
C*H*R*I*S*T*M*A*S
is almost upon us,
AND
now is the time to find those
cute kitchen towels
before they're all picked over.
Kitchen Christmas Set
version 2011.
Chef in Training's
Tuesday Talent Show
and SUCCESS U's
However, I can NEVER remember
what I have posted there.
(This week I was late posting . . .
I'm #163 for the Chef and #20-somthing at U.)
So, from now on, I'm labeling them
so they can be found.
(Don't want any repeats, do we?)
So, without any more wait,
here is my crochet pattern
for Towel Toppers . . .
remember,
C*H*R*I*S*T*M*A*S
is almost upon us,
AND
now is the time to find those
cute kitchen towels
before they're all picked over.
Kitchen Christmas Set
version 2011.
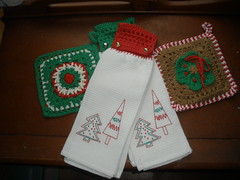
The potholder on the left
with a granny on the back.
The potholder on the left
~ ~ ~ ~ ~ ~ ~ ~ ~ ~ ~ ~ ~ ~ ~ ~ ~ ~ ~ ~ ~ ~ ~
Notice, the towel is folded in thirds
just like it would be when you purchase it.
I like the idea
that I have
the complete area of the towel to use,
not just 1/2 of a towel
that you see in most
towel topper patterns.
just like it would be when you purchase it.
I like the idea
that I have
the complete area of the towel to use,
not just 1/2 of a towel
that you see in most
towel topper patterns.
Okay, sports fans . . .
here is the pattern for the top of the towels.
here is the pattern for the top of the towels.
Materials:
Kitchen Towel
Cotton Yarn
Crochet Hook (I used a G)
Tapestry/Yarn Needle
Sewing Needle
Sewing Thread - or - Embroidery Floss
2 Buttons/Bells
(no ruler . .these are about the size of a thumb nail)
Abbreviations:
ch - chain
dc - double crochet
sc - single crochet
sk - skip
st(s) - stitch(es)
- <><></><><></>
Cut a 36" length of yarn. Thread your needle and tie a knot in the end . . YES, crochet purists, a knot.
This can be found at http://www.ia470.com/wardrobe/stitches.html - Now, you are going to do a button hole stitch across the fold at the top. I am SO ACCURATE when I did these . . . the distance between mine are the width of my little finger nail (+/-).
- When finished, fasten off yarn on the inside of the towel.
Row 1: Sc in the furthest button hole stitch on the right side and continue across this row, ch 1, turn.
(16 sc)
Rows 2 - 16: Sc in each st across, ch 1, turn (16 sc)
Row 17: Sc in in each st across, ch 2, turn. (16 sc)
Row 18: Dc in the same sp, ch 1, sk 1, dc in next st, (ch 1, sk 1, dc in next st) repeat from ( to ) across ch 2, turn.
Rows 19 - 20: Repeat Row 18 EXCEPT, at the end of Row 20 ch 1, turn.
Rows 21 - 22: Sc in the same sp, ch 1, sk 1, sc in next st, (ch 1, sk 1, sc in next st) repeat from ( to ) across ch 1, turn.
Row 23: Sc in same st and next st, ch 2, sk 2, sc in each st across until the last 4 sts, ch 2,, sk 2, sc in last 2 sts.
Row 24: Sc in each st, 2 sc in each ch, across. Fasten Off.
Finish by sewing the bell/button on the right side of the towel, over the 3rd st of the 2nd sc row.
Enjoy
and have a
Happy Holiday
Season

Oh, an afterthought . . if you do make this, let me know. I would LOVE to post pictures of your work.


Thanks for the tutorial. I purchased some flour sack towels to embroidery on and was thinking a nice simple trim would be pretty too. Perfect timing!
ReplyDeleteLove your background. Absolutely perfect.
Those are so nice. I just bought about three or four towels (not the sack towels) to do a topper on. Thanks for the tutorial!
ReplyDeleteYou have such a cute blog!! I found you on the link parties.. I am your newest follower.. If you would like to check out my blog to that would be so great, and follow me back and facebook too. I will be doing free giveaways here shortly on clothing and mineral makeup :)
ReplyDelete-Thanks
Brooke
blushboutiquestyle.blogspot.com